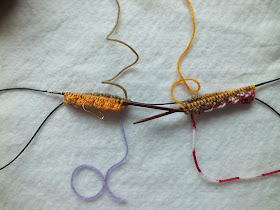
I cast on 48 stitches from each ball using the long tail cast on. I have made these with 44 stitches. Those are very snug on my hands, I usually buy medium size garden gloves just for size comparison. For fingerling yarn I used 2.75mm needles and cast on 52 or 56 stitches always a multiple of 4 so I can do a 2 by 2 ribbing (k2, p2) I would cast on more (60 or 64) for larger hands.
Cast on the stitches then turn the needles over and count off half the stitches (24), bend the cable and pull through so you have half the stitches on the front needle and half on the cable, working yarn (the yellow) is on the cable and should be in the back. Make sure that your stitches are not twisted and knit 2, purl 2 to the end pull the needle around and knit the other side. I have knit all the way around the first reading mitt, the beginning and end are joined.
Count off half the stitches again and pull the cable through so half the stitches are on the front needle and half are on the back with the working yarn (green), make sure stitches are not twisted and knit 2, purl 2 again. Cast on stitches should now be joined in a circle for the cuff.
Continue knitting the ribbing in the round. I place a marker so I know which mitt I started first, the end of each round is when your needles are in this position with the marker on the left.
Sometimes it is nice to knit without keeping track of a tape measure so I knit ribbing until it is about there on my thumb. Then knit 3 - 5 rounds of stockinette before starting the thumb gusset. I knit 4 rounds.
For the thumb gusset: knit to the last 3 stitches place a marker I like to knit in front and knit in back of the next two stitches so that I have the purl bump to identify what row I am knitting. There are now 5 stitches after the marker. Knit 2 more rounds then increase (kf and b) the first stitch after the marker and the second to last stitch. The purl stitches are one stitch in on each side of the thumb gusset. Continue increasing every 3rd row until there are 19 or 21 stitches in the thumb gusset. 19 for smaller mitts and 21 for medium, 23 or 25 for larger mitts.
There are now 21 stitches in the thumb gusset, knit to the marker and remove, then slid stitches to waste yarn or ribbon, with the backward loop cast 3 stitches onto the front needle to replace the 3 that went into the beginning of the thumb gusset. Continue knitting about an inch until stockinette stitches reach the base of the index finger then knit 6 to 8 rows or more of 2 by 2 ribbing, depending how long you want them. Bind off in pattern by lifting first stitch over the second.
Slide gusset stitches to DPNs and pick up 5 stitches over the gap. Most directions say pick up the same number as were used to begin the thumb gusset; 3 in this case but I always had big holes on either side so I pick up 2 extra stitches then knit 2 together to get rid of them.
Knit stockinette around and knit 2 together twice in the thumb crotch. I will knit the last stitch (black) in the thumb with the first (grey) newly cast on stitch together then knit 3 stitches, then knit the last (grey) cast on stitch with the first (purple) stitch on the next needle, I think that closes the holes. Decrease 2 stitches the next 2 round until there are 20 stitches on the DPNs. Knit 3 or 5 rows to just below the thumb joint. Begin 2x2 ribbing for 4 - 6 rows and cast off in pattern by lifting first stitch over the second.
See no big holes on either side of the thumb.

Do the second thumb just like the first, pull up the crotch stitches in the thumb and weave in the ends.
Flash back to my youth and 4-H mode here but a very wise woman told me a few decades ago when giving a demonstration or illustrated talk to assume that your audience knows nothing about your topic a tutorial is similar to a 4-H demonstration only I didn't have to make posters.
Pattern in a nut shell, just the facts:
Cast on 48 stitches or a multiple of 4 depending on the size of needles and yarn
knit 2x2 ribbing about the length of your thumb for the cuff
knit 3-5 rows
begin thumb gusset, place marker before the last 3 stitches increase 2 stitches every 3rd round until you have 19-21 stitches
move thumb stitches to waste yarn
cast on 3 stitches continue knitting to base of index finger
2x2 ribbing 6 or more rounds cast off
move thumb stitches to DPNs pick up 5 stitches in the thumb crotch
K2tog 2 times in the thumb crotch 3 rounds until you have 20 stitches or 16 for smaller mitts
knit 3-5 rounds to just below thumb joint
2x2 ribbing 4-6 rounds cast off.
Happy knitting and linking to Judy's On the Needles. --Ann--


Thanks so much for the detailed instructions and yarn information for your wonderful reading mitts! Can't wait to try them.
ReplyDeleteAnn, thank you so much for the pattern! I am going to put these on my list and know where to find you if I have questions. :)
ReplyDelete